Driving with faulty taillights is a serious safety risk, especially at night or in the dark. Tail lights, brake lights, reverse lights, and turn signals are an important safety feature that helps other drivers understand your actions on the road.
Replacing tail lights is a simple job you can handle yourself with basic tools.
This guide will help you safely and correctly change a taillight.
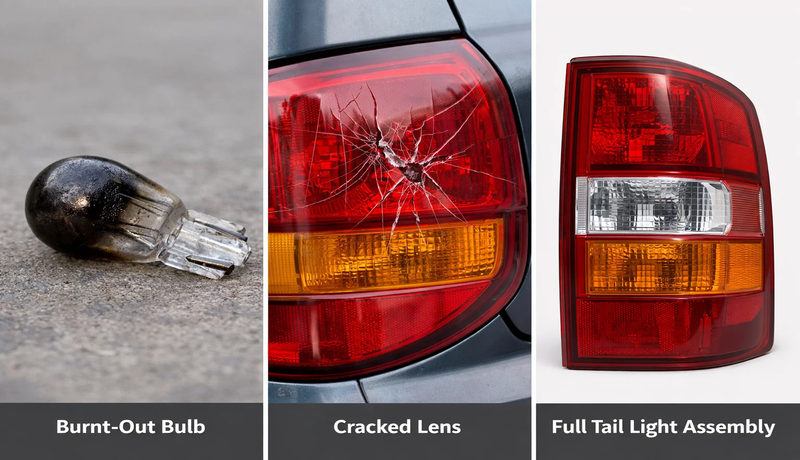
Do You Need to Replace the Bulb, Lens, or Full Tail Light Assembly?
A tail light is a rear lighting system in a vehicle that includes tail lights(red running lights), brake lights(bright red), reverse lights(white), and turn signals(amber or red).
It helps other drivers understand your actions. It improves visibility, especially at night or in low-light conditions. That’s why it is an important safety feature in your vehicle.
Before you start any replacement, you need to determine what exactly is damaged in your car or vehicle.
When to replace the bulb?
If your tail light bulb is burned out, replacement is usually quick and easy. For example, if the brake light works but the running light doesn’t, the issue is likely a single faulty bulb.
A fast-blinking turn signal is another sign that one of the bulbs has failed. In these cases, the lens and housing are still intact, so you don’t need to replace the full assembly.
Simply remove the socket, insert a new bulb, and fit it properly. This simple task saves time and avoids unnecessary cost.
When to Replace the Full Assembly?
Sometimes, replacing just the bulb is not enough. If the lens is cracked, water can enter the housing and damage internal components.
Broken mounting tabs, accident damage, or fog inside the unit are signs you need a full replacement. In newer cars, many taillights use sealed LED boards, which means you cannot replace individual bulbs.
In such cases, replacing the entire assembly is the safest option. OE-fit aftermarket assemblies help reduce installation issues and provide proper sealing. Useful for drivers who want a long-term solution.
Tools and Parts Needed Before You Start
Before you begin, gather all necessary tools and parts to avoid interruptions during the process.
Tools
- Phillips screwdriver for removing screws.
- 8mm or 10mm socket for bolts.
- Trim removal tool to avoid damaging panels.
- Gloves to protect your skin from sharp edges.
- A microfiber cloth to clean dirt or moisture.
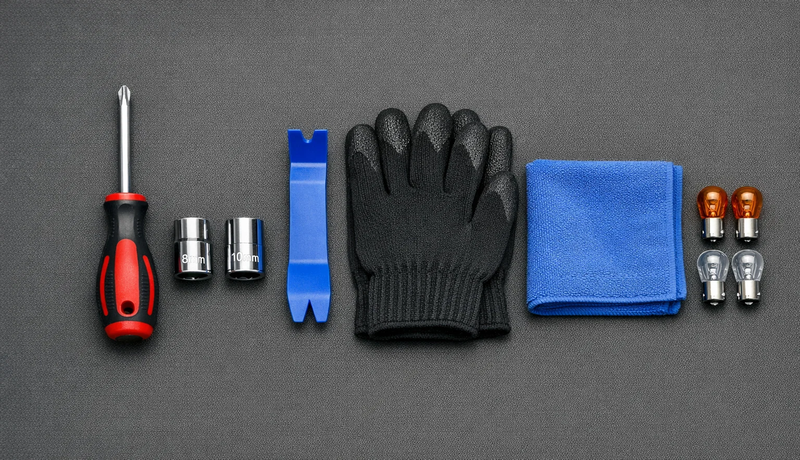
Accessories
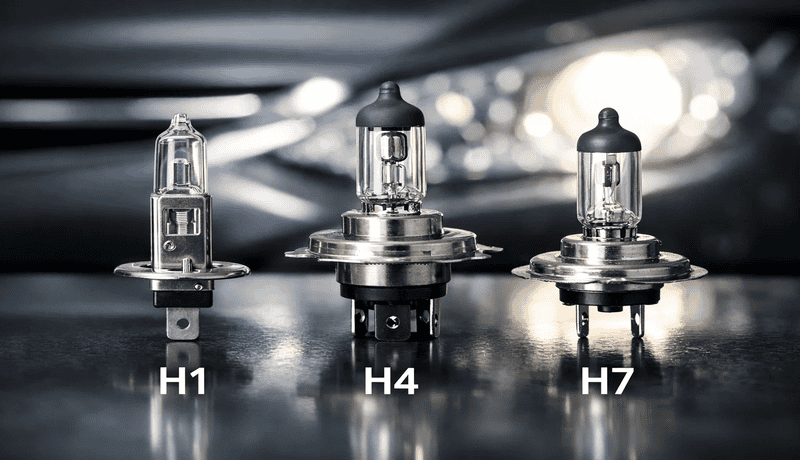
- Correct bulb size or full tail light assembly.
- Replacement gasket to maintain a proper seal.
- Dielectric grease to protect electrical connections.
- Replacement clips in case old ones break during removal.
The right tools make the job easier and prevent damage to screws, housing, and trim. A high-quality replacement part also ensures better fitment and durability over time.
How to Replace a Tail Light Step by Step
Replacing tail lights is generally an easy process. The exact steps can vary depending on the vehicle design. Older cars usually provide direct access. Mostly, new cars have tighter spaces, hidden panels, or sealed components that need more careful handling. Follow these steps to avoid damage and to proper fit.
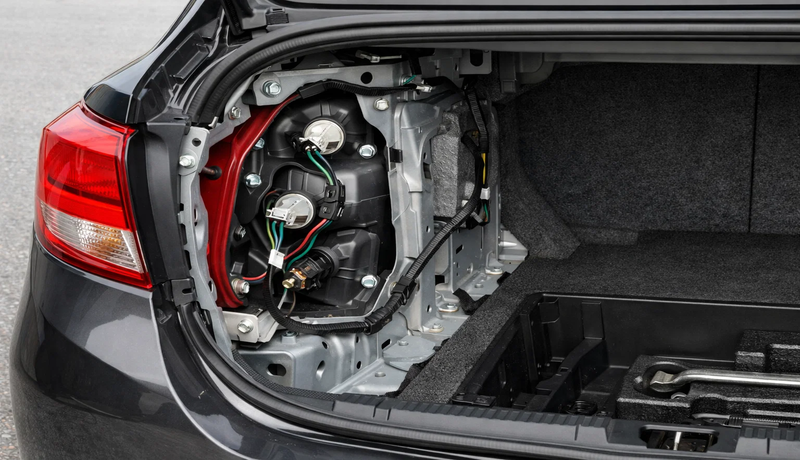
Step 1: Access the Tail Light Housing
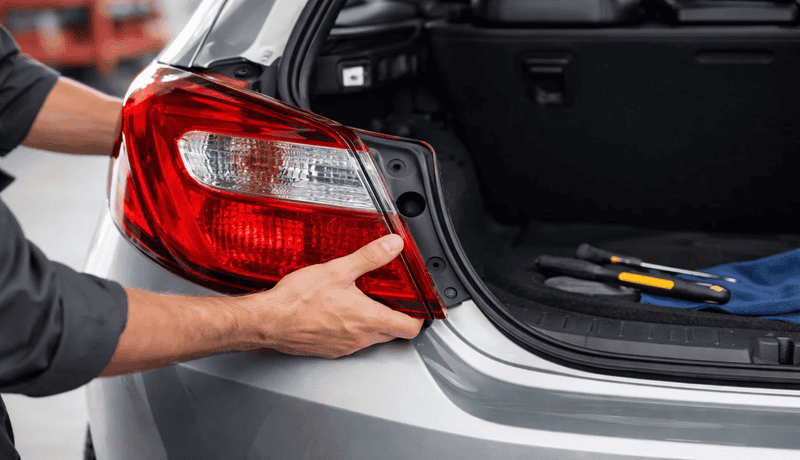
First of all, you need to remove the old taillight. Open the trunk, hatch, or tailgate of your car. Most vehicles have access points inside the trunk area.
Look for a removable cover, carpet liner, or trim panel. Carefully remove it to expose the back of the tail light assembly. In SUVs, there can be hidden access panels designed for maintenance.
If you are working on a pickup truck, you need to access the taillight from the outside or the bed. Always take a moment to locate the correct access point before removing anything.
Step 2: Remove Bolts, Clips, or Fasteners
When you locate the housing, remove all visible screws or bolts with a screwdriver or socket. Check for hidden clips or plastic tabs that hold the assembly in place. Use a trim removal tool to gently release them.
Do not pull the taillight directly from the outside. This can crack the lens or damage mounting points. Instead, gently loosen it from inside and guide it outward evenly. If the assembly feels stuck, check again for hidden fasteners instead of applying force.
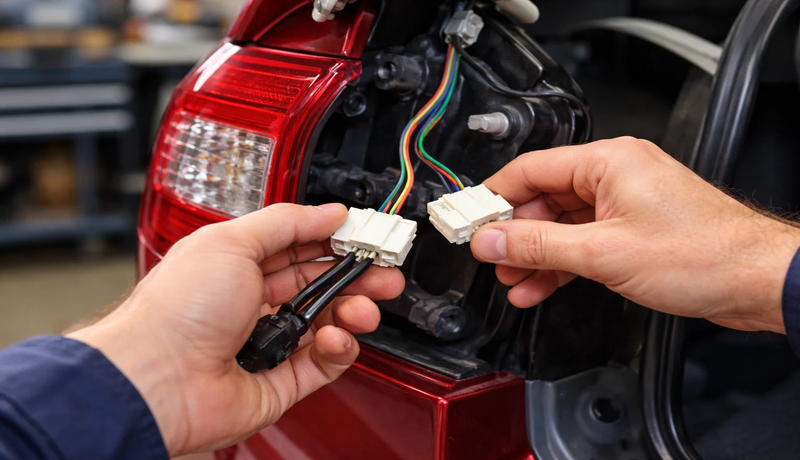
Step 3: Disconnect the Wiring Harness
After loosening the assembly, carefully pull it outward to access the wiring. Press the release tab on the connector and disconnect the wiring harness. If it feels stuck, do not force it. Check for locking tabs or dirt buildup.
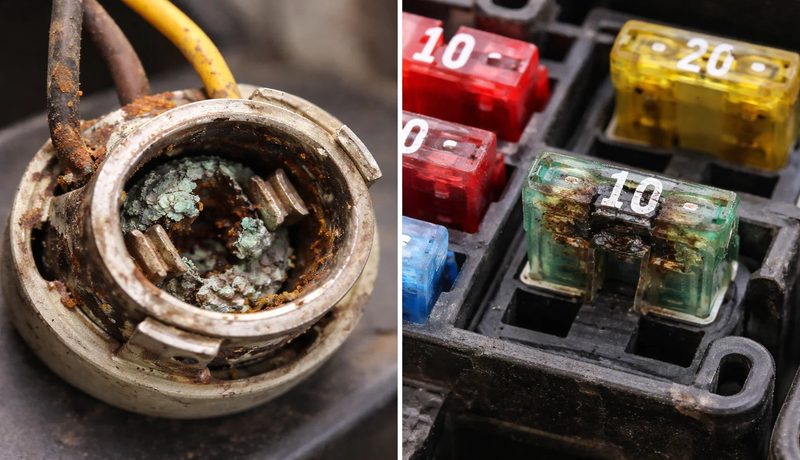
Inspect the socket and connector for signs of corrosion, moisture, or melting. These issues can affect performance and should be addressed before installing a new part. If the wiring appears damaged, repair it before continuing with the installation.
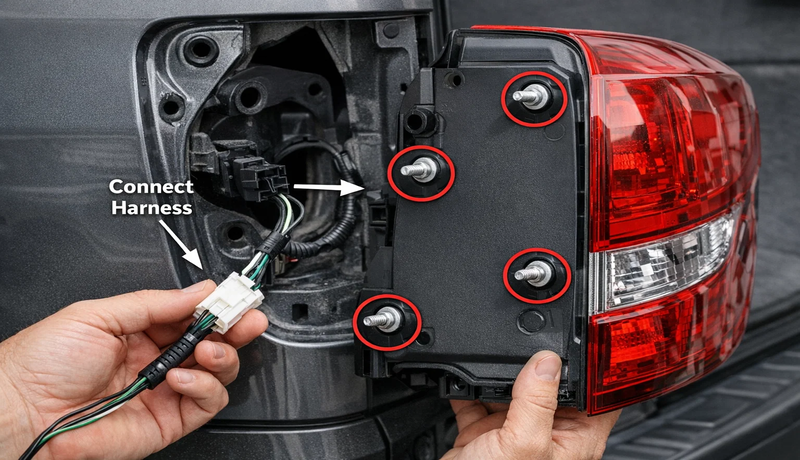
Step 4: Install the New Bulb or Assembly
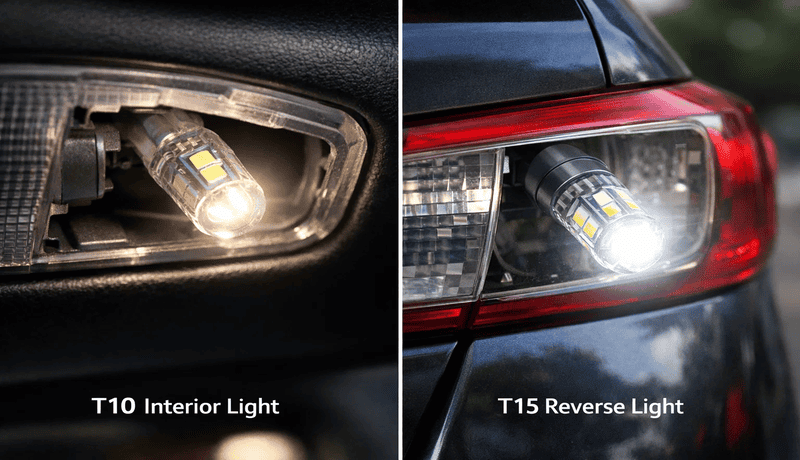
If you are replacing a tail light bulb, twist the socket counterclockwise and remove it from the housing. Take out the old bulb and insert the new bulb. Make sure it matches the correct size and type listed in your owner’s manual.
For a full assembly replacement, align the new unit with the mounting studs and insert it carefully into position. The gasket should sit evenly against the vehicle body to prevent water leaks.
Connect the wiring harness firmly until it clicks into place. A loose connection can cause intermittent lighting issues or signal failure while driving.
Step 5: Reinstall and Test
After installation, secure the assembly using screws, bolts, or clips. Everything should be tightened properly. Over-tightening can damage plastic components.
Before closing the trunk, test all light functions so that everything works correctly:
- Tail lights for nighttime visibility.
- Brake lights for signaling stops.
- Reverse lights for parking and backing up.
- Turn signals for direction indication.
- Hazard lights for emergency situations.
- Side markers for additional visibility.
Turn on your vehicle and check each light function carefully. This step is crucial for safety and to avoid future issues while driving at night.
Why Your New Tail Light Still Doesn’t Work
Sometimes, even after replacement, the lights could not work as expected. Understanding the possible causes can save time and frustration.
Electrical Causes
A blown fuse is one of the most common reasons a new light does not work. Check your owner’s manual to locate and inspect the correct fuse. A loose connector or corroded socket can interrupt the electrical connection. Cleaning and reconnecting these parts can solve the issue.
In some cases, the wiring harness can be damaged due to wear or previous accidents. This requires repair before the light can function properly.
LED Upgrade Issues
If you installed LED bulbs or upgraded tail light assemblies, compatibility issues can arise. If the polarity is incorrect, the light will not turn on.
Some vehicles need resistors to prevent hyper flash, where turn signals blink too quickly. Others can display CAN bus warnings if the system detects abnormal power usage.
Using high-quality LED assemblies with stable components reduces these issues. Poor-quality products cause early failure, water leakage, or loose connections.
When Should You Upgrade to LED Tail Light Assemblies?
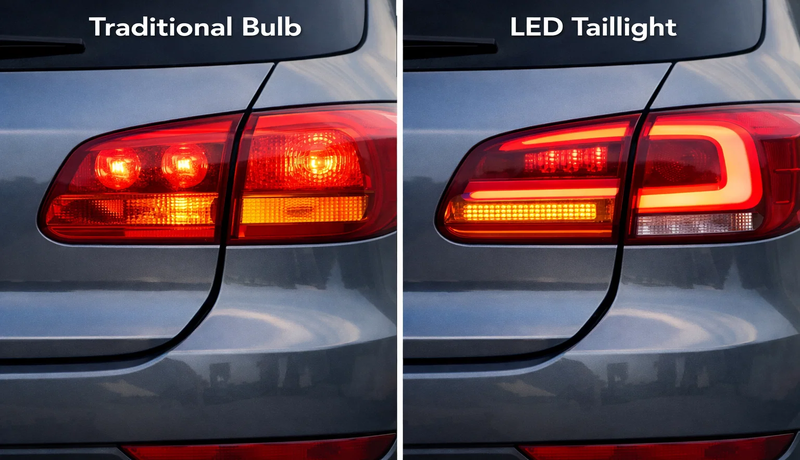
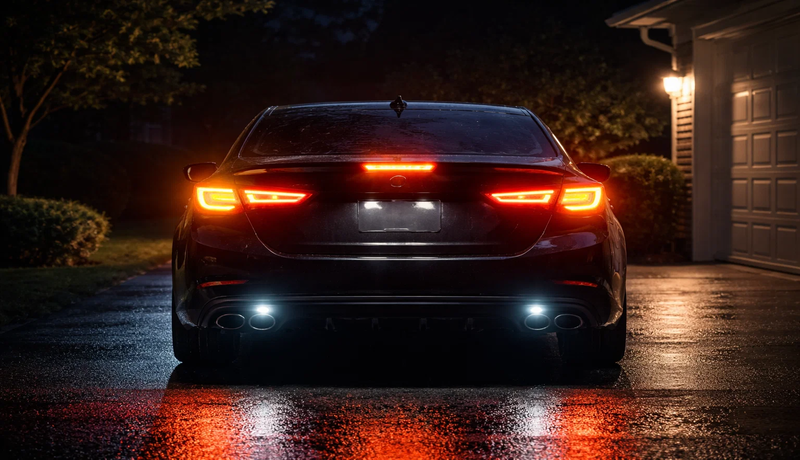
Upgrading to LED taillights is becoming more common among drivers and businesses. LED lights provide brighter output, which improves visibility for other drivers. They also respond faster when braking. It gives more reaction time to the vehicles behind you.
Modern styling options, such as smoked lenses or dynamic turn signals, enhance the look of your car. Distributors and automotive brands prefer LED assemblies due to better margins and product differentiation.
LED assemblies, custom designs, private labeling, and model-specific molds help businesses stand out in competitive markets. LED products also reduce warranty claims because they last longer and resist damage better than traditional bulbs.
How to Choose a Reliable Tail Light Supplier for Aftermarket or OEM Projects
Choosing the right supplier is critical for both performance and long-term business success.
OE Fitment Accuracy
Accurate fitment is essential for easy installation. Each unit should match the original mounting points, stud positions, and connector layout of the specific vehicle model. Even a slight deviation can cause uneven gaps, pressure on the housing, and difficulty in tightening screws.
A properly engineered assembly aligns flush with the vehicle panel. It ensures the gasket compresses evenly to create a watertight seal. If the fit is inaccurate, it can lead to vibration during driving, which can loosen fasteners over time or damage the wiring connection inside the socket.
Connector matching is equally important. A precise plug-and-play design avoids rewiring and ensures stable electrical contact. Poorly matched connectors result in loose connections and intermittent signals. It also causes overheating at the contact point.
For installers and distributors, consistent OE-level fitment reduces installation errors, shortens service time, and minimizes return rates caused by compatibility issues.
Waterproof and Durability Testing
High-quality tail lights undergo strict testing to ensure durability. Look for products with IP67 waterproof ratings, which protect lights against dust and water intrusion.
Additional tests include vibration resistance, UV exposure, and temperature cycles. So, the lights can handle different driving environments without failure.
Compliance and Market Access
Certifications such as DOT, SAE, and E-mark confirm that the product meets safety and legal standards. These certifications are important for local and international markets. Certified products can be sold and used legally.
MOQ and Customization
For B2B buyers, MOQ (Minimum Order Quantity) and customization capabilities help in supplier selection. MOQ directly impacts your initial investment, inventory risk, and pricing strategy. It’s important to choose a supplier that offers flexible order quantities based on your business scale.
Customization helps to differentiate your products in a competitive market. Reliable manufacturers typically provide options such as custom lens colors, sequential turn signals, logo engraving on the lens, and branded packaging.
Understanding production lead time is essential for maintaining a stable supply chain. Shorter and more predictable lead times enable you to plan stock levels, avoid delays, and respond quickly to market demand.
A supplier that balances reasonable MOQ, strong customization support, and efficient production timelines can significantly improve your overall business performance.
Conclusion
Changing the faulty tail light or assembly is essential for vehicle maintenance and road safety. By following the correct steps, you can do the task easily. Ignoring faulty lights can lead to accidents, fines, and risks. If your current lights show signs of damage or reduced brightness, consider upgrading to a high-quality solution for better visibility and durability.
Upgrade Your Tail Light Solutions Today
Looking for reliable, OE-fit tail light assemblies that install easily and last longer? At Carlight Vision, we deliver high-quality, tested lighting solutions designed for performance and durability.
Visit our products page or contact us to discuss your requirements and get a customized quote today.
FAQs
Q1: Can I replace a taillight myself?
Yes, you can. Disconnect the vehicle power, open the trunk or rear cover, remove the screws and wiring harness, then install the new tail light and reconnect the circuit. The process typically takes 20–30 minutes.
Q2: Do I need to replace the whole tail light assembly?
It depends on the damage. If only the bulb is faulty, a simple replacement works. But if the sealed LED units or the housing are damaged, a full assembly change is needed for proper function.
Q3: Why is my new taillight not working?
The issue is often electrical, such as a blown fuse, loose connector, or corroded socket. Always check wiring connections and ensure the bulb or assembly is installed correctly.
Q4: Are LED taillights better than bulbs?
Yes. LED tail lights last longer and respond faster (about 0.3 seconds quicker than traditional bulbs). It gives other drivers more reaction time. The output is brighter, and modern designs improve overall visibility and styling.
Q5: How do I choose a tail light manufacturer?
Focus on fitment accuracy, certification, and MOQ. Choose a supplier that matches your vehicle model precisely, meets standards like DOT or E-mark, and offers order quantities that fit your business needs.