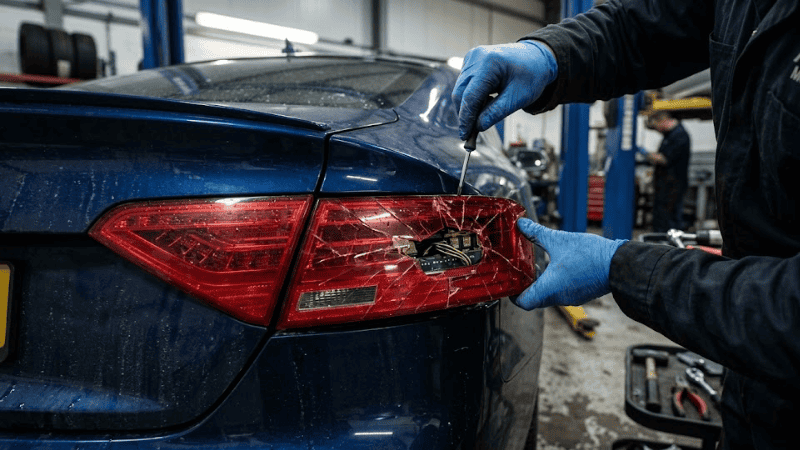
Misaligned headlights can blind oncoming drivers and reduce visibility, which leads to accidents at night. For safety, legality, and clear vision, proper headlight alignment is essential.
Even new cars can leave the factory with imperfect headlamp alignment and vibration, and load changes or minor impacts can worsen it over time. You’ll learn how to aim headlights correctly using proven standard methods.
Preparation: Set Up for Success
Preparation matters most before starting to adjust headlight beams. Skipping this leads most people end up with inaccurate headlight alignment.
Headlight Adjustment Checklist
- Park on a level surface facing a flat wall or garage door.
- Your fuel tank is at least half full to simulate normal driving weight.
- Check tire pressure and inflate to factory specifications.
- Remove unusually heavy cargo from the trunk or bed.
- If your vehicle has a lift kit or lowered suspension, note that your legal headlight height and beam angles will differ slightly.
- An owner’s manual provides specific guidance for headlight alignment.
- Locate the vertical and horizontal adjusters (mostly behind or above the headlamp housing).
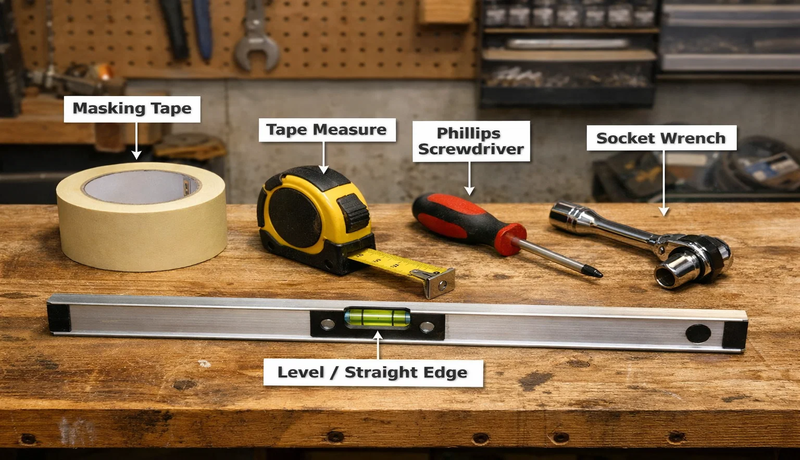
- Gather tools such as masking tape, tape measure or ruler, Philips screwdriver or socket wrench, level or straight edge.
Skipping vehicle headlight prep will result in headlights aimed too low (short visibility) or too high (dangerous glare).
Marking the Wall: Standard & Small-Space Setup
For accurate headlight aiming, these steps are the foundation.
Step 1: Mark Headlight Centers
Park the vehicle close to the wall (about 1–2 feet away). Turn on the low beam headlights and place a small piece of tape at the center of each beam hotspot. Now measure from the ground to the center of each headlight and transfer that height onto the wall using tape.
You should now have two horizontal tape marks aligned with the center of each headlight.
Step 2: Draw Reference Lines
Draw a horizontal line through both tape marks. Also, draw vertical lines through each headlight center. This creates your X and Y alignment grid.
Step 3: The Standard 25-Foot Method
Back the vehicle straight back 25 feet (7.62 meters) from the wall. The top of the low beam should land 2–3 inches below the horizontal tape line. This slight downward angle prevents glare and illuminates the road properly.
Step 4: The 10-Foot Method for Small Spaces
If you don’t have 25 feet of space, use proportional math.
Formula:
25 ft cut-off = 2–3 inches below center
10 ft is 40% of 25 ft, so:
- 2 inches × 0.4 = 0.8 inches
- 3 inches × 0.4 = 1.2 inches
At 10 feet, the cut-off should be 0.8–1.2 inches below the headlight center line. Using the 25-foot drop at 10 feet will aim your headlights dangerously low.
Step 5: Verify the Wall Markings
Use a bubble level or straight edge to confirm that:
- The horizontal tape line is perfectly level across the wall.
- The vertical tape lines are truly vertical and not angled.
- The left and right LED headlight center marks are at the same height (unless the vehicle itself is uneven, which should be corrected before alignment).
Even a small tilt in the tape lines can cause a noticeable aiming error at distance, mostly with sharp LED cut-offs. A 30-second verification of the wall setup ensures the rest of the headlight alignment process is based on a reliable reference.
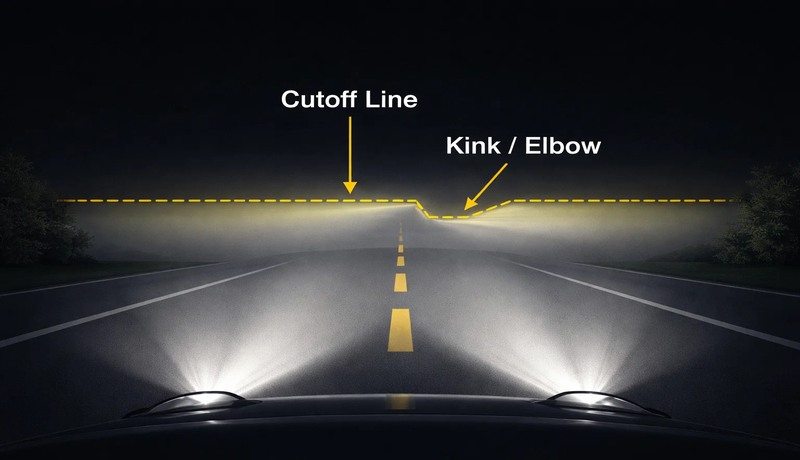
Understanding the Cut-Off Line & Kink (Elbow)
The cut-off line is the sharp boundary between light and dark in your low beam pattern. The flat part illuminates the road, and the Kink(or elbow) is the upward step that illuminates road signs on the passenger side. The kink is like a shelf flat across, then stepping upward on the right.
The top of the low beam cut-off sits just below the tape line (25 ft: 2–3 inches; 10 ft: 0.8–1.2 inches). The brightest spot (hotspot) aligns directly with the headlight center marks in high beam.
Step-by-Step Adjustment Process
When the wall is marked correctly and the vehicle is prepared, it’s time to adjust the headlights. Work slowly and methodically.
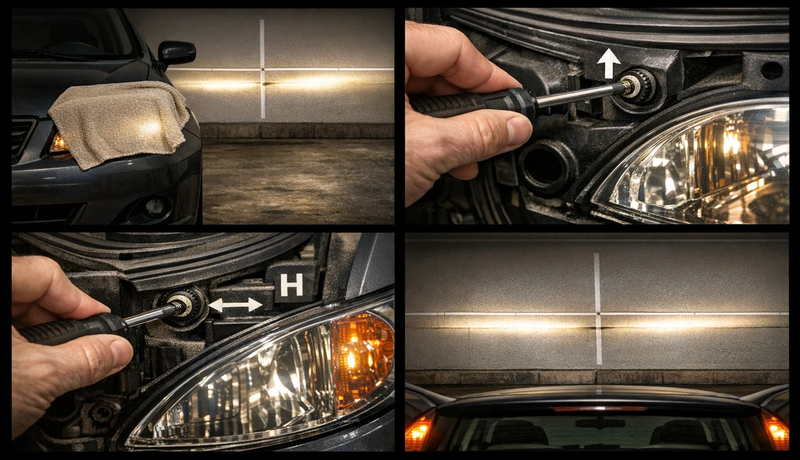
Step 1. Isolate One Headlight at a Time
Cover one headlight using a towel, cardboard, or a thick cloth. This prevents overlapping beam patterns, and you can easily identify the true cut-off line and kink of the active headlight. If you try to adjust both headlights at a time, it can lead to compensation errors.
Step 2: Adjust the Vertical Aim (Height)
Find the vertical adjustment screw. It is usually positioned on the top or rear of the headlamp housing and marked with a vertical arrow or “V”. Turn the screw in small increments (usually 1/8–1/4 turn at a time) and observe how the cut-off line moves on the wall.
The top edge of the low beam cut off should sit:
- 2–3 inches below the headlight center line at 25 feet, or
- 0.8–1.2 inches below the headlight center line at 10 feet.
If the cut-off is too high, it will cause glare for oncoming drivers. If it is too low road illumination distance will be shortened. After each adjustment, wait for a second so the beam can stabilize, and then evaluate its position.
Step 3: Adjust the Horizontal Aim (Side-to-Side)
Find the horizontal adjustment screw, which is usually marked with an “H” or a sideways arrow. Turn the screw slowly until the kink (or elbow) in the beam pattern aligns with the vertical tape line corresponding to that headlight.
This will let the flat part of the beam illuminate the lane ahead. The upward step remains on the passenger side for sign and shoulder visibility. The beam also does not intrude oncoming traffic lane.
Step 4: Repeat for the Other Headlight and Verify Symmetry
Now cover the adjusted headlight and repeat steps 2 and 3 on the other side. When both headlights are adjusted, check that:
- Both cut-off lines are at the same height.
- Both kinks are symmetrically positioned.
- The overall beam pattern appears balanced and centered.
Minor differences between left and right are normal, but obvious height or angle mismatches should be corrected.
Step 5: Perform a Nighttime Road Test
Take a short nighttime drive on a familiar, lightly trafficked road and check for the following:
- Oncoming other drivers are not flashing their headlights (a sign of glare).
- Road markings, lane edges, and signs are visible at a comfortable distance.
- The immediate area in front of the car is evenly lit without a dark “shadow zone” close to the bumper.
- The beam reaches far enough ahead to allow reaction time at highway speeds.
If needed, return and make fine adjustments in very small increments. Always check alignment after heavy load, suspension changes, and bulb replacement for safety and regularity on the road.
Troubleshooting Aftermarket LED Headlights (Information Gain)
Most of the time, aftermarket LED headlight problems are diagnosed as misaligned. However, in reality, the issue is optical mismatch, incorrect LED orientation, or unstable housings. Before touching the adjustment screws, confirm that the light source itself is behaving correctly.
LED Beam Clocking (Emitter Orientation Matters)
Unlike halogen filaments, LED emitters have a defined light-emitting surface. It must be aligned with the reflector or projector’s focal geometry.
For most reflector and projector housings, the LED chips must face horizontally (3 and 9 o’clock positions). Reflector optics are designed around a thin, horizontal filament. This happens when the LED surface does not mimic that orientation,n and the reflector focuses light incorrectly.
To fix this, rotate(“clock”) the LED bulb until the emitters are exactly horizontal before attempting any aim adjustment. Many modern LED bulbs include a rotatable collar for this purpose.
Bi-LED Projector Systems
Bi LED projectors use a single LED source and an internal mechanical shutter to switch between high and low beams. That’s why Low beam and high beam alignment are mechanically linked. Also, any low-beam misalignment will be amplified when the high beam is activated.
Always align the low beam first and align it perfectly. The high beam position is automatically defined by the shutter’s travel path and cannot be independently aimed. If your low beam is even slightly high or off-center, the high beam will overshoot. It will cause excessive glare and poor long-range targeting.

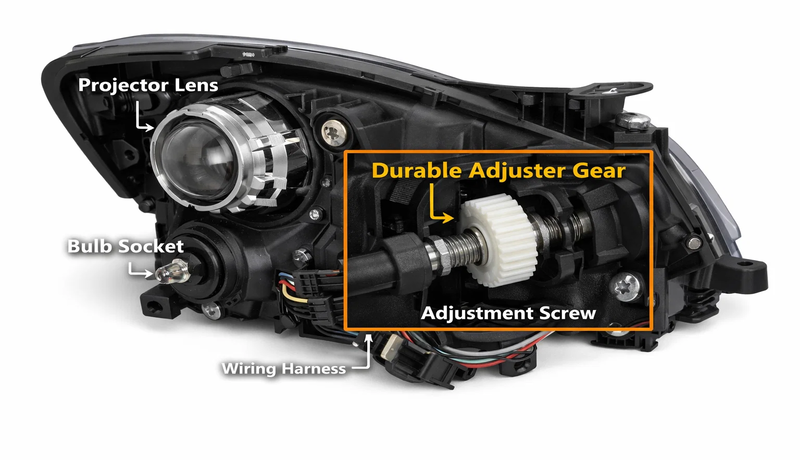
Low-Quality or Lightweight Headlamp Housings
Some aftermarket housing uses soft plastics, thin mounting points, or weak adjustment gears. It causes beam drift over time due to vibrations. The headlights’ aiming becomes inconsistent when driving on rough roads, and inability to hold the precise alignment.
The headlight adjusters rely on mechanical resistance to maintain position. Weak gears or flexible housings cannot hold fine tolerances. If the housing is instable the beam starts moving after hitting bumps. The headlight will also rise or drop after weeks, and the adjustment screws feel loose or spongy.
In these cases, repeated adjustment will not solve the problem because the hardware itself is the limitation.

Small-Space Adjustment Tricks (10-Foot Method)
In urban garages, driveways, and workshops where the depth is limited, the standard 25-foot method is not possible. The 10-foot method is not a shortcut to aim and adjust the headlight. It is a geometrically scaled version of the 25-foot method.
Step-by-Step 10-Foot Headlight Alignment Method
Step 1: Prepare the Vehicle
Park the vehicle on flat ground and set tire pressure to normal driving values. The vehicle should be loaded as normally driven (driver weight, typical cargo, half to full fuel tank). Also, bounce the suspension to let it settle.
Step 2: Choose and prepare a vertical flat surface
You can use a garage wall or door, a folding board, or a plywood panel leaned against a wall. Use a spirit level to confirm the surface is vertical. A tilted surface can cause vertical aiming errors.
Step 3: Measure and mark the headlight center height
Start measuring from the ground to the center of each headlight lens. Transfer that height to the wall with horizontal tape. Also, mark the vertical centerline of each headlight as well. You should now have marked the optical center of each headlight on the wall.
Step 4: Calculate the correct cut-off height for 10 feet
Standard reference at 25 ft, the drop should be 2 inches. So the vertical drop per foot is:
2inches/25ft=0.08 inches per ft
At 10 ft:
10×0.08=0.8 inches
So your cut-off line should be 0.8 inches below the headlight center height. Place a second horizontal tape line 0.8 inches below the headlight center line.
Step 5: Aim the Low Beams
Turn on low beams(not high or fog lights). Start adjusting each headlight. The sharp horizontal cut-off aligns with the 0.8-inch lower tape line. The left edge of each beam aligns with the vertical tape mark of that headlight. Adjust one headlight at a time and cover the other.

Linear Scaling for Other Distances
You can use the same proportional logic for any distance:
Drop=Distance/25 ×2 inches
| Distance | Calculation | Drop |
|---|---|---|
| 15 ft | (15 ÷ 25) × 2 | 1.2 inches |
| 12 ft | (12 ÷ 25) × 2 | 0.96 inches |
| 8 ft | (8 ÷ 25) × 2 | 0.64 inches |
Professional/B2B Considerations
For repair shops, fleets, and installers, headlight alignment is not just about visibility. It is about repeatability, durability, and long-term accuracy.
Low-quality headlight assemblies mostly use soft plastic adjuster gears or loose mounting points. These slowly drift out of position due to road vibration, temperature changes, and minor impacts. This leads to misalignment after headlight installation.
Professional-grade headlight assemblies from CarLight Vision are designed with heavy-duty adjuster mechanisms that hold their position once set. The technicians can achieve a precise aim during installation and trust that the alignment will remain stable over time.
These assemblies are also engineered to be compatible with:
- LED upgrades and Bi-LED projector systems.
- Aftermarket housings and OEM mounting points.
- Vehicles with suspension lifts or load variations.
These headlight assemblies are ideal for both DIY enthusiasts who want reliable alignment at home and professional shops that need predictable, repeatable results at scale.
By using assemblies built for long-term stability, shops reduce rework and improve customer satisfaction.
Conclusion
Proper headlight adjustment improves nighttime safety, comfort, and visibility. With a few basic tools, careful preparation, and the right reference points, you can align your low and high beams accurately as in a professional shop.
For a standard 25-foot method or if you are using a 10-foot version, the principles remain the same: level setup, precise marking, slow adjustments, and real-world testing.
Get Headlight Alignment That Stays Accurate Over Time
At CarLightVision, we engineer headlight assemblies with durable adjustment mechanisms that hold their position after aiming. We help DIY users and professional installers maintain proper beam alignment, reduce rework, and improve nighttime visibility safely.
Contact us now to get headlights that align accurately, stay stable over time, and meet real-world driving and safety demands.
FAQs Section
Q1: Can I aim headlights myself?
Yes. Park on level ground, mark the wall correctly, and follow the 25-ft or 10-ft method. This way, you can achieve safe and accurate alignment at home without special equipment.
Q2: How far should low beams point?
Low beams should illuminate the road roughly 160–200 feet ahead. It should keep the cut-off low enough to avoid shining directly into oncoming drivers’ eyes.
Q3: Adjust high beams separately?
Yes, in vehicles that have separate bulbs for low and high beams or adjuster screws for vertical and horizontal aim. But mostly in modern cars high beams are mechanically linked to the low beam position. So, once the low beams are aligned correctly, the high beams will also be aimed properly.
Q4: How to adjust aftermarket LED headlights?
First, rotate (clockwise) the LED bulb so the chips face left and right (3 and 9 o’clock), then aim the beam using the wall cut-off just like a standard bulb.
Q5: How often should alignment be checked?
Check headlight alignment at least once a year, and always after suspension changes, headlight or bulb replacement, front-end impacts, or if nighttime visibility suddenly feels off.